
1. Game Overview
West of Loathing is a single-player, comedic Wild West RPG known for its stick-figure art and absurdist humor. Players choose one of three classes, Cow Puncher, Snake Oiler, or Beanslinger, then explore a monochrome frontier full of puzzles, strange quests, and bizarre foes like skeleton bandits and demon cows. Its light turn-based combat and sharp, witty writing make humor and exploration the game’s main attractions.

- Developer: Asymmetric Publications
- Publisher: Asymmetric Publications
- Release Date: August 10, 2017
- Platforms: Windows, macOS, Linux, Nintendo Switch, Stadia, (iOS)
- Genre: Comedy adventure, RPG
- Core Loop: Explore world → Accept quests and interact with NPCs → Travel and encounter challenges (battles or puzzles) → Gain rewards (XP, gear, items) → Return / advance story → Repeat

Quick Fact: You can only recruit one pardner per playthrough, and each pardner has a unique achievement tied to finishing the game with them
2. Core Facts Table (Quick Reference)
Below is a quick reference overview that shows the essential systems and how they shape what you do as a player. It outlines what classes you pick, how combat works, and what you explore. It reveals how each system influences strategy, choice, and completion if you want to maximize content or do everything.

| System | What It Does | Player Impact |
|---|---|---|
| Classes | Three starting classes: Cow Puncher (melee and muscle focus), Beanslinger (magic and mysticality focus), Snake Oiler (ranged and moxie focus) | Class choice influences stat growth, skill access, crafting paths, and aspects of gameplay style and flavor (though all classes retain basic melee & ranged options) |
| Combat | Turn-based battles using action points; many encounters support alternative (non-combat) resolutions through checks and dialogue options | Players can approach many challenges via diplomacy, sneaking, or other checks instead of brute force; consumables, equipment, and stats affect success in combat or noncombat paths |
| Exploration and Quests | Open-ish overworld (after initial prologue) with multiple towns (e.g. Dirtwater, Frisco), puzzles, secrets, hidden content, and various side quests | Many quests and areas are optional or missable; thorough exploration or using community checklists can help with full completion or achievement runs |

Quick Reminder: Disable the auto-spend XP setting early. You’ll want to place points manually to hit key thresholds (especially in Moxie) rather than letting the game distribute them automatically.
3. Classes, Stats, and Combat
At the start, you choose one class, which gives you a unique early skill and directs your perk progression. Cow Puncher emphasizes melee (Muscle), Beanslinger favors magic (Mysticality), and Snake Oiler leans into ranged attacks, item use, and Moxie based checks. All three classes retain access to both melee and ranged options, so no class becomes completely locked out of any combat style.

- Core stats: Muscle, Mysticality, and Moxie influence both combat and noncombat checks. Each stat improves your effectiveness in its domain (e.g. Muscle boosts melee damage and reduces melee damage taken).
- Starter Skills and Perks: Each class receives a signature ability early on, and as you level up you can unlock class-specific perks and skill branches. Your class choice influences early dialogue, puzzle, and world-interaction options, especially in the prologue and early game.
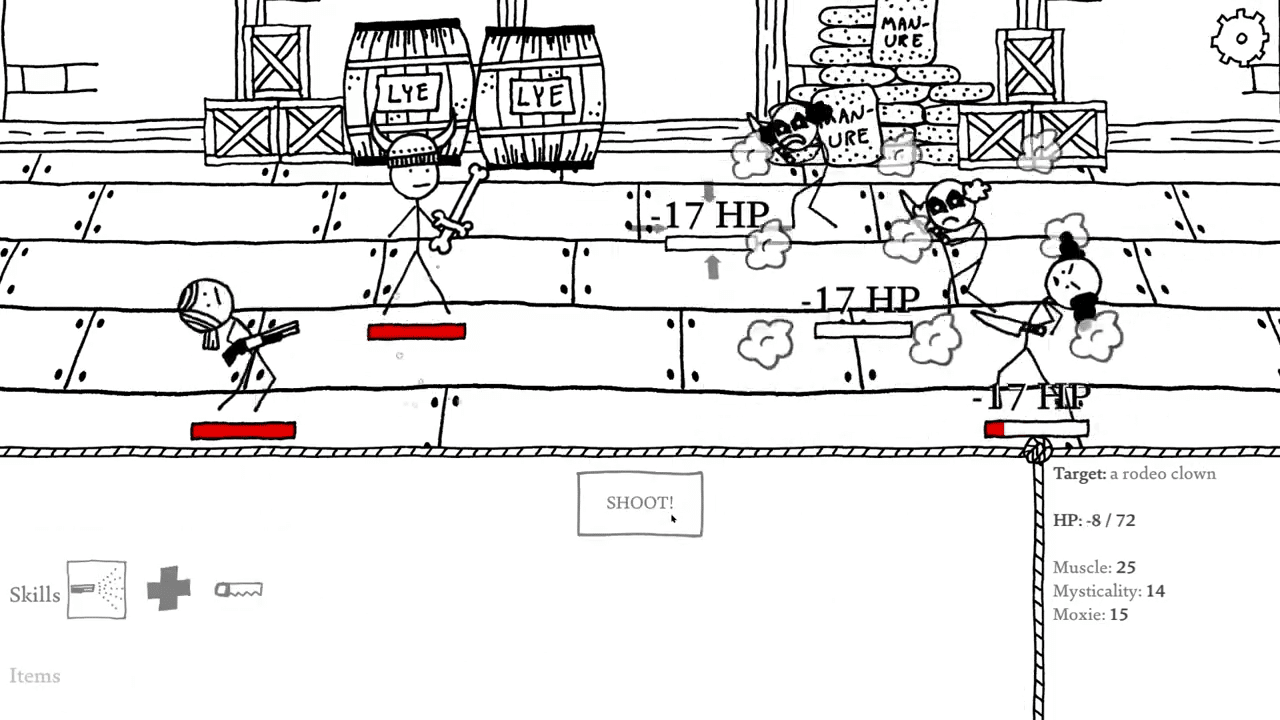
- Combat Mechanics: Battles use turn-based combat with Action Points (AP) and health (HP). While basic attacks often cost no AP, many special skills do. Your AP fully restores at the start of each new fight.
Many encounters can be bypassed or resolved using noncombat checks (dialogue, stat checks) instead of fighting, when available. - Gear and Consumables: Hats, weapons, armor, and clothing provide stat bonuses and may unlock special dialogue or interaction options (for example, meeting check thresholds).
Consumables (food, booze, potions) can provide temporary stat boosts or resource replenishment. Use them strategically, especially when attempting to pass a difficult noncombat check or to boost performance in a fight.

Practical Tip: Buy the Bean Golem spell early (from the mercantile in Dirtwater) when you can. It remains a strong utility/defense spell throughout Hard Mode runs.
4. Quest Flow, Key Choices, and Missables
The story begins in the Boring Springs prologue, then expands into wider regions (e.g. Dirtwater, Frisco) as you follow main quests and optional side content. Many quests, items, and achievements are order-dependent or easily missed during the prologue; community prologue checklists remain popular among players seeking to lock in early rewards and recruitable pardners.

- Prologue Priorities: The prologue hides numerous items, perks, and optional companions (pardners) you can miss if you don’t explore thoroughly. For example, picking up the turnip, needles, mugs, dynamite, or pursuing specific dialog paths and quests may affect how much meat you leave with and which pardners you can recruit.
- Dialogue Checks: Many outcomes depend on stat thresholds, wearing certain outfits, or having items to pass checks. You may need to use temporary consumables or boost your stats before key interactions to succeed without reloading.
- Pardners And Outcomes: You can recruit one of four possible pardners in Boring Springs (Crazy Pete, Susie Cochrane, Doc Alice, or Gary the Goblin). Which one you recruit (and how you recruit them) can affect certain achievements or narrative flavor. Once you choose a pardner, that choice is locked in for that playthrough

Quest Tip: In the Dirtwater Jail quests, you can choose between “fill the cells” or “fill the morgue” paths. The options you can access (and which NPCs join you) depend on your stats and what pardner you recruited.
5. DLC, Achievements, and Replayability
DLC (Reckonin’ at Gun Manor):
West of Loathing has one major DLC titled Reckonin’ at Gun Manor. It adds a new haunted house area (Gun Manor), new ghosts to deal with, more dialogue, new puzzles/checks, and several additional outcomes depending on whether you resolve ghosts peacefully or confront them. The DLC doesn’t end or override the main game because you can finish the main storyline and still return to explore or complete parts of the DLC in the same save file.

Achievements:
The base game has 23 achievements, and the Gun Manor DLC adds 5 more. Some achievements are hidden, some require specific choices, item use, or paths (for example dealing with ghosts peacefully vs violently in the DLC). Also, there are achievements tied to how you finish the game (which partner you brought, class you chose, etc.)

Replayability:
The game offers good replay value. Key factors increasing replayability include:
- Class choice: Picking Cow Puncher, Beanslinger, or Snake Oiler gives different stat growth, early skills, and slightly different ways to handle checks or dialogue.
- Partner (pardner) choice: Which pardner you recruit at the start changes some dialogues, interactions, and endings.
- Missable content and achievement paths: Because some quests, items, and dialog options are only accessible under certain conditions (e.g. having certain stats, items, or having done things in a specific order), you may need multiple playthroughs to see everything or to get 100% achievements.
- DLC branch choices: In the DLC, choices like resolving ghosts peacefully vs violently lead to different outcomes, which encourages replaying to see all possibilities.

Resource Note: The Alexandria Ranch is a valuable resource hub for perk books like Percussive Maintenance and Expert Silversmithin’, so visit when you can.
6. Practical Strategies and Advanced Tips
Here are 7 practical strategies and advanced tips. These will help you optimize your playthroughs, snag missable content, and get better performance in harder modes.
- Choose Lockpicking or Dickering as your starter skill to open up checks or get better shop deals early.
- Use consumables just before critical dialogue or stat checks so you meet thresholds you might otherwise miss.
- In Hard Mode, once you equip the Hard Hat it stays on, so pick it carefully and plan your gear around it.
- Save and use dynamite in combat because it does fixed damage and can be spammed if you act first.
- Favor Snake Oiler + Toilet Pistol + Expert Poisoner build for strong hybrid potential (damage, poison, utility).
- Avoid multi-enemy fights when possible; single target skills or stuns (e.g. Susie’s ability) help simplify tough battles.
- Gear matters. Hats, clothing, and silver-plating boost stats and unlock dialogue options, so optimize your equipment constantly.

Pro Tip: Use the theater play and bird calls puzzle in Gustavson’s Gulch to disable patrols rather than fight because it helps you bypass dangerous encounters.
7. Conclusion

Whether this is your first run or your tenth, this game rewards careful play, clever choices, and willingness to explore every odd corner. Use the strategies, checklists, and tips here to avoid regrets, unlock hidden content, and squeeze out every ounce of fun and completion. Even after you finish, experimenting with different classes, pardners, DLC paths, and achievement routes ensures the game still has secrets to reveal.


Customer Reviews
Thanks for submitting your comment!